
Getting those knitting needles and crochet hooks organized!
Guest Blogger: Debbie Zaleski @sproutingjubejube


Hello friends! After following along with the Organize-Along with Jennifer at Bee Sew Inspired this past summer, there's still one little area of my studio that needed some tidying up. All my knitting needles and crochet hooks had taken over a drawer and it was just such a huge mess!
I hope this FREE tutorial will inspire you to get that section organized or maybe you know someone that would really love to receive this as a gift. I was just so inspired by Jennifer's fabric collection, Forest Friends, that this whole project came together so easily.

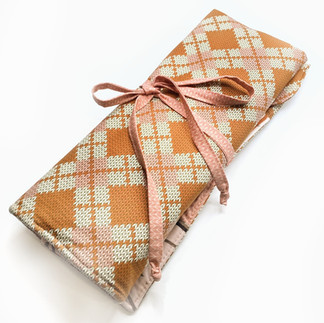
The messy drawer went from looking like a game of pick-up-sticks to this.....
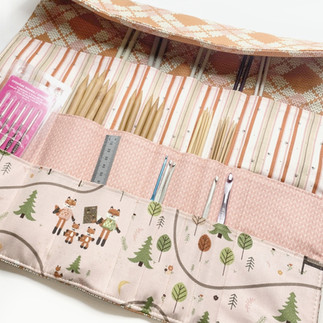
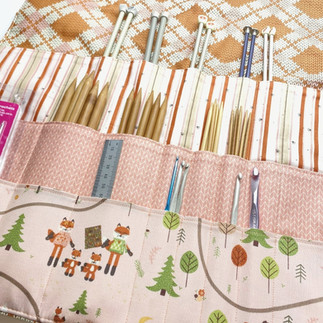
Everything is now in its' place!

What You Need:

3/4 yard of main fabric for the front and back (I used Forest Friends by Jennifer Long for Riley Blake Designs)
1/2 yard of 3 different fabrics to create the different levels of pockets
Non-woven interfacing
Self healing cutting mat
Rotary cutting tool & ruler
Iron
The usual sewing supplies
Let's Get Started:
1. Determine what fabric print will be placed in the three different levels of pockets.
Measurements to cut pieces will be given in height by width:
2 Main fabric - 21" x 19"
2 Front set of pockets - 5" x 19"
2 Second set of pockets - 8" x 19"
2 Third set of pockets - 12" x 19"
2 Ties 2" x 24"
Cut (1) of each pocket piece from the non-woven interfacing.
Cut (1) 21" x 19" piece in Fusible Fleece for the main fabric.

2. Fuse the interfacing to the wrong side of the fabrics according to manufacturer's directions. This will be the inside part of your pockets. Fuse the interfacing to the wrong side of the main inside fabric. Finally Fuse the Fabric Fleece to the wrong side of the outside main fabric.

3. Take the pocket pieces from the front set of pockets and place them with right sides together. Stitch a seam 1/4" away from the top edge. Press the seam open then turn the pocket pieces right side out.
*Tip: Make sure if you have a directional print that your print is right side up!

4. Top stitch the top of the pockets 1/8" away from the top edge. Repeat the process for the other two sets of pockets. Remember you want your pieces with the interfacing to be on the inside of the pockets.

5. Trace a rounded edge at the top end of the main fabrics. Only the two top corners are rounded! I like to use a big spool of thread but you can used anything you like.


6. Cut the two top corners on both the outside and the inside main fabric.


7. To create the ties fold the two 2" wide strips in half length-wise and press. Open up the fold and bring the two raw edges inward and press. Fold in half length-wise once again and press. Top stitch the length of the two ties at 1/8" from the edge.
8. Start by placing the main fabric with the interfacing face up. Layout the the pockets so that the bottom edge are all lined up. Baste into place. Add the ties right above the second set of pockets and baste into place.
9. Here is a suggestion of how to divide up the pockets. Draw lines with a soluble fabric pen to help keep your stitching lines straight. Stitch through all the layers of pockets and the main inside fabric. Make sure you backstitch so that the seam will be more durable.
*Tip: Play around with different pocket width to be able to add tools such as scissors or little note pad. Don't let your pockets be less than an 1" in width.

10. Now that the pockets are all divided up and stitched into place and the ties are basted into place, it's time to place the main fabric with the Fusible Fleece over the side with the pockets. Clip or pin the layers with right sides together. Match up the rounded corners at the top. Stitch around the perimeter using a 1/2" seam allowance leaving a 4.5" opening at the top. Clip curves, trim corners and reduce seam allowances to about 1/4".

11. Turn your work right side out through the opening making sure that the rounded top corners are nice and smooth and that the bottom corners have a nice point, press. Top stitch around the perimeter at 1/8" from the edge.
12. Fill up the roll with your knitting needles and crochet hooks
Your knitting needle & crochet hook roll is now complete!
This project is perfect for gift giving! I know a few that would love to have their very own. There's so many ways you can adapt this tutorial to suit different needs. Make is shorter with only one layer of pockets for pencils or create one for paint brushes!
I hope you've enjoyed this tutorial!
Thanks so much for reading!


Have you Heard?
Do you want to be inspired with Jennifer? Watch this intro video to learn what the Maker's Club is all about HERE and don't forget to subscribe to the Bee Sew Inspired YouTube Channel.
More Inspiration:
To see more Organizational tutorials to help keep your tools and projects organized take a look at our posts from this past summer!
2022 Guest Bloggers:
July 8: Anne Boundy www.saidwithlove.com.au - Week 1: Floss Book Tutorial
July 15: Julia Fraizer www.bayhillstudio.com - Week 2: Grandmother's Groovy Sewing Machine Cover
July 22: Jennifer Long www.beesewinspired.com
July 29: Holly Clarke https://hollyclarkedesign.com
August 5: Bev McCullough https://flamingotoes.com
August 12: Lindsay Chieco https://www.instagram.com/linzentart/
August 19: Vickie Zaleski www.crochetingvixen.wordpress.com
August 26: Deb Zaleski https://www.instagram.com/sproutingjubejube/