
This October we want to have a little fun with Pumpkins! They come in so many different sizes, shapes and colors all of them are just so beautiful! These pumpkin stuffies will brighten up any fall day!


You can make these pumpkin stuffies as scrappy as you like, or all one color. They're perfect for decorating your home for the Fall season. The pattern template comes in two sizes, download the template, select the size you want to make choose your fabric!

Let's get creative! Just gather the supplies below, then download the pattern/files. Don't forget to share your project on social media using the hashtag #BSImakersclub and tag @beesewinspired.

Tools
Sewing Machine or Embroidery Machine
Rotary Cutter
Quilting Ruler
Self-Healing Mat
Iron and Wool Mat
Scissors
Hand sewing needle
Long doll needle (doll needles are very long, about 5")
Materials
Green and brown Benzie Wool Blend Felt
Scraps of your favorite cotton fabrics in oranges, or any other colors that suit your style
Embroidery Thread in matching colors
Thread
Polyester Fiber Fill
Non-woven fusible interfacing


If you haven’t already, become a Bee Sew Inspired - Maker's Club Annual Member. This gives you access to our entire growing, Maker's Club library of downloads! Including Quilt - Story Block of the Month patterns, Doll Patterns and Accessories (Sewing and Machine Embroidery versions), PDF templates, SVG cut files and more!

1. Download the Pumpkin Pattern designed by Bee Sew Inspired. You can choose either the PDF Pattern to hand cut your shapes, or the SVG Cut File and follow the directions to have your Cricut Maker cut the felt shapes. Make sure to use your rotary blade and set the fabric to felt. Use the template to cut out six panels in total.
2. Fuse the Heat-N-Bond Fleece to the wrong side of your decorative fabrics BEFORE cutting the shape. Fuse the interfacing to the circle, this will be the pumpkin base. This will help keep the fabric stable while cutting out the curved edges. Choose fabrics in two designs or up to six if you'd like each panel to be different.
3. Use the templates cut out the pumpkin shape.

4. To create the texture in the pumpkin stem, fold the brown felt rectangle at different intervals and stitch a zigzag stitch all the way at the edge of the fold. There is no right or wrong way, you can fold as many times as you like. I have 4 folds for a 2.5" x 3" rectangle.

5. fold the rectangle with wrong sides together. Using a zigzag stitch, close up the top and the side of the pumpkin stem. slightly stuff the tail with fiber fill to give a little bit of body. Set the tail aside.

6. Take two adjacent panels and place right sides together. Stitch down one edge using a 1/4" seam allowance.

7. Repeat until all six panels are joined together, with the fabrics alternating. To join the pumpkin up, stitch the edges of the first and last panels together. Stitch down from the top all the way down to the bottom.

8. While your pumpkin is inside out, insert the tail in the top (the smaller hole) and hand stitch the tail to the pumpkin body. Make sure you close up the opening to the tail at the same time.

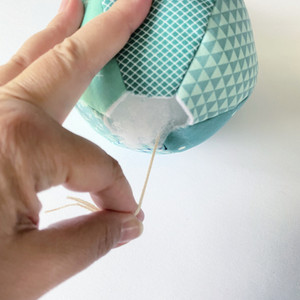
9. If you have long doll needles skip to step 11 If not, that's okay! Simply use some embroidery floss or double up on thread. Pass the thread through the top of the pumpkin body, leave a long thread tail.
10. Turn your pumpkin right side out, it is ready to be stuffed with fiber fill. Don't underestimate how much toy filling you need! Keep pushing wisps in until it's tightly packed. Keep the thread tails from being pushed into the pumpkin with the stuffing. Pull slightly on the thread creating a dimple at the top and your pumpkin has a nice shape. Tie knots so that the thread is secured to the pumpkin base.


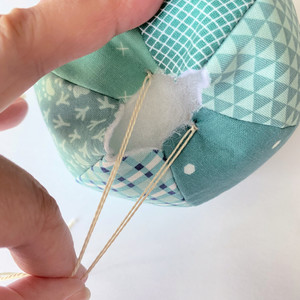
11. Thread your long doll needle with embroidery thread and secure the thread at the stem of the pumpkin. Stitch a few small securing stitches and push the needle back into the pumpkin. Bring the needle out again at the top of the pumpkin. Pull your thread taut, push the needle into the pumpkin and wiggle it through the filling until it comes out through one of the bottom. Pull tight. Keep passing the needle through the pumpkin and pulling until you're satisfied with your pumpkin shape. This will form a dimple in the top and bottom of the pumpkin to give it its shape. Secure your thread.

12. Use a long stitch to close up the bottom of your pumpkin. Tie securely when you're satisfied with the gathers you've created.

13. With a pair of pinking shears, trim the circle (pumpkin base).


14. Hand stitch the circle base to the pumpkin with 2 or 3 strands of embroidery floss. I used a backstitch but you can use another decorative stitch if you choose.
15. Hand embroider the leaf using 2 or 3 strands of floss. You can use a backstitch or stem stitch or another stitch if you like.
16. Hand stitch the leaf to the pumpkin stem. And there you have it! The perfect little pumpkin for a table center piece or home decor!
We are here to help you explore your creativity with weekly inspiration, downloadable patterns, cut files and printable templates that make your craft life easier. We believe in the power of creativity to nurture the soul and to empower the next generation. Our designs are created with simplicity in mind and we always strive to provide you with the highest quality DIYs. Share what you’ve been up to with our Annual membership online community, or on social media by using the hashtag #BSImakersclub — your creativity is our biggest inspiration!


Membership gains you access to our full library of DIY projects complete with pattern downloads, tutorials, templates, embroidery files, SVG cut files and more! Head over to our membership page to see a full list of benefits. And be sure to follow us on Instagram, Facebook, and YouTube. We look forward to making this the most creative year of your life! Happy creating! ~ Jennifer Long

Download the Pumpkin Stuffie
patterns, templates, SVG cut files below.
Not a member? Join today!
Click the button below

Member's Download the Pattern below.
Simply login to the Bee Sew Inspired with your member email and password, to unlock all the downloads below.