
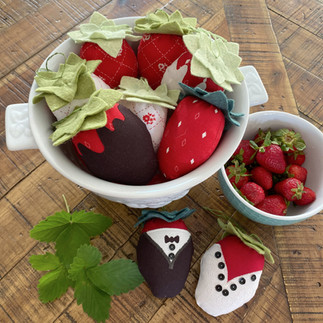
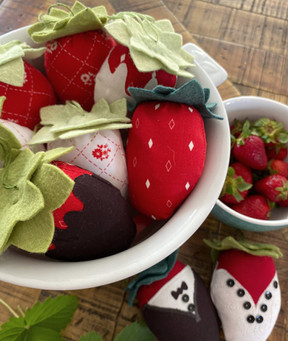
Strawberries are definitely a popular fruit among many people because of their color and sweetness and ease of picking and processing. Wouldn't it be wonderful to have strawberries to display on your counter that never spoil? What about the taking your strawberries to the next level by dipping them in chocolate? There is even some surprise "dipped decorations" in this tutorial! Please keep reading!


Why not turned your dipped Strawberries into Bride and Groom Strawberries? or simply Formal Strawberries. Choose between (3) pattern options (Dipped, Bride or Groom) in sewing pattern templates, SVG cut files, or machine embroidery files.

Let's get creative! Just gather the supplies below, then download the pattern/files. Don't forget to share your project on social media using the hashtag #BSImakersclub and tag @beesewinspired.

Tools
Sewing Machine or Embroidery Machine
Rotary Cutter
Quilting Ruler
Self-Healing Mat
Iron and Wool Mat
Scissors
Hand sewing needle
Materials
Green Benzie Wool Blend Felt (use the code "BEESEWINSPIRED" at checkout for 10% off your first purchase at Benzie)
Small pieces of Heat n Bond LITE SEWABLE
Scraps of your favorite cotton fabric (Red, white and brown and/or black)
Embellishments
Embroidery Thread in matching colors
Thread
Small amount of Polyester Fiber Fill


If you haven’t already, become a Bee Sew Inspired - Maker's Club Annual Member. This gives you access to our entire growing, Maker's Club library of downloads! Including Quilt - Story Block of the Month patterns, Doll Patterns and Accessories (Sewing and Machine Embroidery versions), PDF templates, SVG cut files and more!

1. Download the Strawberry Pattern designed by Bee Sew Inspired. You can choose either the PDF Pattern to hand cut your shapes, or the SVG Cut File and follow the directions to have your Cricut Maker cut the felt shapes. Make sure to use your rotary blade and set the fabric to felt.
2. Fuse the Heat-N-Bond to the wrong side of your decorative fabrics BEFORE cutting the shape. This will help keep the fabric stable while cutting out all those curved edges of the “chocolate dip”

3. Using the templates cut out the strawberry shape and cut out the chocolate dip shape making sure to cut out two each for a back and front. Fuse the chocolate dip shape to the strawberry.

4. Lay strawberry shapes right sides together and stitch using a 1/4” seam allowance. Trim seam allowances and clip curves.

5. Turn right side out smoothing out the rounded edges and stuff firmly leaving the top 3/4” of the strawberry shape without stuffing. Using a hand sewing needle make long stitches to be able to gather your strawberry shape. Gather as tightly as you can. Make a few small stitches and knot your thread.

6. Using the leaf templates cut out two layers of leaves from the felt. Pin in place at the center of the leaves at the top of the strawberry.

7. With two or tree strands of embroidery floss, back stitch a circle about1” in diameter making sure you go through both layers of the leaves and through the strawberry. Insert a length of floss to make a loop at the top if you wish to hang your strawberry.

8. Fuse the Heat-N-Bond to the wrong side of your decorative fabrics BEFORE cutting the shape. This will help keep the fabric stable while cutting out all those curved edges.

9. Fuse the white of the shirt to the jacket part of the groom strawberry. Use a sating stitch over the shirt and jacket part for a nice clean finish. Cut out the bow-tie and fuse to the shirt. You may also wish to hand embroider the bow-tie.

10. Fuse the tuxedo top to the strawberry shape, remember to create a back to your strawberry. Use a satin stitch where you want to create a nice clean finish, on the front AND the back of your groom strawberry. Lay strawberry pieces with right sides together and stitch along the curved edges using a 1/4”seam allowance. Clip curves.

11. Turn right side out smoothing out the rounded edges and stuff firmly leaving the top3/4” of the strawberry shape without stuffing. Using a hand sewing needle make long stitches to be able to gather your strawberry shape.

12. Gather as tightly as you can. Make a few small stitches and knot your thread.

13. With two or three strands of embroidery floss, back stitch a circle about 1” in diameter making sure you go through both layers of the leaves and through the strawberry. Insert a length of floss to make a loop at the top if you wish to hang your strawberry.

14. Using the fabric glue, add sequins for the buttons on your strawberry grooms shirt
Use the same steps to create a strawberry bride!
We are here to help you explore your creativity with weekly inspiration, downloadable patterns, cut files and printable templates that make your craft life easier. We believe in the power of creativity to nurture the soul and to empower the next generation. Our designs are created with simplicity in mind and we always strive to provide you with the highest quality DIYs. Share what you’ve been up to with our Annual membership online community, or on social media by using the hashtag #BSImakersclub — your creativity is our biggest inspiration!


Membership gains you access to our full library of DIY projects complete with pattern downloads, tutorials, templates, embroidery files, SVG cut files and more! Head over to our membership page to see a full list of benefits. And be sure to follow us on Instagram, Facebook, and YouTube. We look forward to making this the most creative year of your life! Happy creating! ~ Jennifer Long


Download the
Dipped Strawberry, Groom Strawberry and Bride Strawberry
patterns, templates, SVG cut files and machine embroidery files below.
Not a member? Join today!
Click the button below

Member's Download the Pattern below.